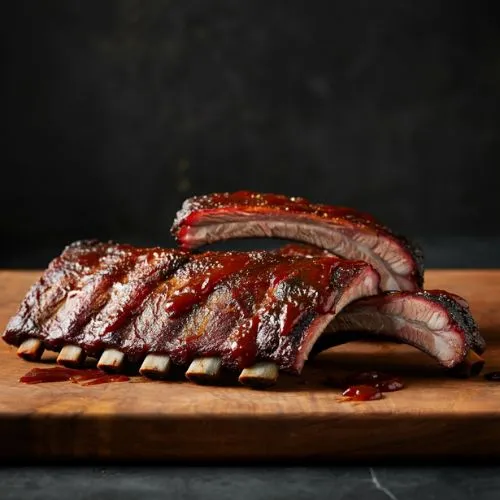
Master the 3-2-1 smoking method for juicy, fall-off-the-bone smoked baby back ribs. Perfect for BBQs, with step-by-step instructions and pro tips!
Smoked baby back ribs are the ultimate summertime meal, perfect for family gatherings, game day feasts, or birthday celebrations. These succulent ribs, known for their fall-off-the-bone tenderness, shine with a flavorsome blend of spices and rub—think brown sugar, paprika, and garlic powder. Using a pellet smoker for 3 hours locks in a juicy, moist flavor, but alternate methods like an oven (2 hours), slow cooker, or pressure cooker (1 hour) work too. The foolproof 321 ribs method (smoke, wrap, glaze) ensures competition-style results every time, while secret weapons like butter and honey add sticky, caramelized depth.
Don’t let the messy reputation scare you—removing the membrane and using tongs during glazing keep things tidy. Pair your ribs with side dishes like cheesy funeral potatoes for a satisfying feast, or try a quick appetizer hack: smoke them for 1 hour, then toss in barbecue sauce for bite-sized perfection. Whether cooked outside on a smoker or indoors during colder months, this recipe delivers a delicious, bone-loving flavor that turns any meal into a backyard BBQ triumph.
What Are Baby Back Ribs?
Baby back ribs are a tender, flavorful cut of pork from the upper ribcage near the spine and loin—the name “baby” refers to their shorter size, not the pig’s age. Trimmed from a rarely used muscle near the loin, they’re leaner than spare ribs but retain enough fat to stay juicy during cooking. Raw ribs feature curved bones and a thin membrane on the back (remove this for better spice absorption!). While they can be roasted or grilled, smoking is the ultimate method: low heat (around 225°F) breaks down collagen near the spine, creating fall-off-the-bone tenderness, while aromatic wood smoke (like hickory or applewood) infuses rich, savory depth. The result? Ribs with a caramelized crust, melt-in-your-mouth texture, and a smoky-sweet flavor that’s earned them a top spot at backyard BBQs. Once you’ve tasted properly smoked baby backs, you’ll see why they’re a Pitmaster’s pride.
Baby Back Ribs vs. Pork Spare Ribs: A Pitmaster’s Guide
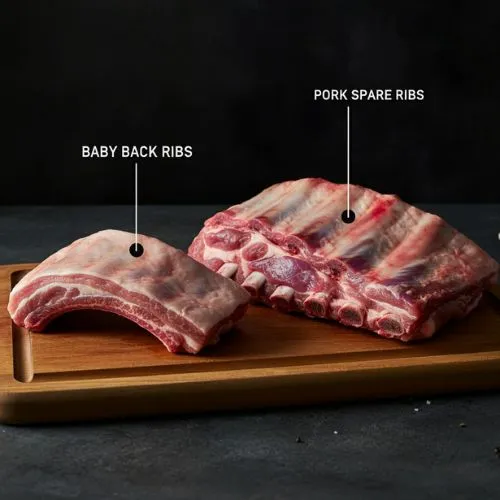
1. Origin & Anatomy: Where They Come From Matters
Baby back ribs are the upper-deck VIPs of the ribcage, snuggled near the spine and loin—think of them as the “couch potato” muscles of the pig. Since these muscles barely lift a hoof, the meat stays buttery, tender, and lean, with short, curved bones that cook like a dream.
Spare ribs, though? They’re the blue-collar workers from the belly near the breastbone. Bigger, flatter, and marbled with fat and chewy connective tissue, they’re built for flavor but demand your patience. Picture them as the slow-cooked brisket of the rib world—worth the wait, but testy if rushed.
2. Tenderness & Cooking Time: Patience vs. Convenience
Baby backs are the weeknight heroes. Toss ’em in a smoker at 225°F for 5–6 hours, and they’ll turn tender without fuss. Their lean build means collagen waves the white flag fast—perfect for newbies or when you’re craving ribs.
Spare ribs? They’re the project car in your driveway. At 225°F, they need 6–8 hours to melt their tough fibers into juicy goodness. Sure, you could crank the heat to 375°F for an hour, but that’s like speed-reading Shakespeare—you’ll miss the depth.
Pro tip: Baby backs forgive a distracted cook (forgot the timer? No sweat). Spare ribs? They’ll punish impatience with chewiness.
3. Meat-to-Bone Ratio: A Matter of Preference
Baby backs are the meat lovers’ dream—thick, juicy nuggets cling to every bone. Bite in, and it’s all porky goodness, no guesswork.
Spare ribs trade meat for flavor bombs—narrow strips of meat hugged by smoky fat pockets. Do you want them meatier? Trim the excess fat and cartilage (“St. Louis style”), but brace for a longer cook.
Final Word: Which Should You Choose?
- Baby backs = Quick, foolproof, and meaty. Ideal for:
- Weeknight dinners 🕔
- First-time smokers 🎓
- Crowds who want ribs, not a project 🍖
- Spare ribs = Bold, fatty, and deep. Ideal for:
- Lazy Sundays 🌤️
- Flavor adventurers 🔥
- Pitmasters craving a challenge ⏳
Choose your fighter—baby backs for tender ease, spare ribs for smoky bragging rights. Either way, you win. 😉🔥
How to Pick Perfect Baby Back Ribs: A Butcher’s Secrets
When hunting for high-quality baby back ribs, treat it like a treasure hunt—look for these three clues:
- Bright Pinkish-Red Color: Fresh ribs should look vibrant, like a rosy sunset. Avoid dull, grayish racks or packages swimming in liquid (a sign of freezing or age).
- Even Marbling: Seek ribbons of fat woven through the meat—not huge globs. This fat melts during cooking, basting the ribs from within to keep them juicy.
- Minimal “Shiners”: If bones poke through the meat like headlights (“shiners”), the butcher over-trimmed—more meat = more flavor.
Pro tip: Ask your butcher for untrimmed racks—they’ll have the best meat-to-bone ratio. Trust me, a little DIY trimming beats pre-butchered disappointment.
Where to Buy Ribs: A Shopper’s Guide
- Butcher Shops:
The gold standard for fresh, high-quality ribs. Butchers hand-cut racks with even meat distribution, minimal “shiners,” and often source locally raised pork. Ask for untrimmed ribs to maximize meat yield—they’ll even remove the membrane for you! Pro tip: Build a rapport with your butcher; they’ll hook you up with prime cuts.
- Supermarkets:
It is convenient and budget-friendly, but the quality varies. Look for fresh (not frozen) ribs in the meat aisle—avoid pre-packaged racks swimming in liquid (a sign of preservatives). Stores like Whole Foods or Wegmans often carry better-than-average options. Pro tip: Check sell-by dates and opt for brands like Swift or Smithfield.
- Wholesale Stores (Costco, Sam’s Club):
Ideal for feeding a crowd or meal prepping. Buy ribs in bulk at a lower price, but inspect the packaging for excess liquid or uneven trimming. Pro tip: Freeze individual racks in vacuum-sealed bags for future cooks.
Why it matters:
Butcher ribs have top-tier flavor and texture. Supermarkets offer quick fixes. Wholesale offers quantity over finesse. Choose based on your priorities—quality, convenience, or volume!
The 321 Rib Method: Balancing Tradition and Practicality
The 321 method—3 hours uncovered on grill grates for smoky flavor, 2 hours wrapped in foil with brown sugar, apple cider, and butter to smother the meat in moisture, then 1 hour to finish with a sticky BBQ sauce glaze—is a backyard legend for cooks wanting fall-off-the-bone, super tender ribs. While BBQ purists dismiss it as too traditional for competition (where KCBS judges dock points if pork doesn’t grip the bone), its popularity with home cooks comes from consistency: foolproof, delicious results for family dinners, potlucks, or gatherings where guests demand sweet, savory, and flavorful ribs. Over years of smoking, I’ve learned to set temps low (225°F), determine doneness by meat shrinkage (not just suggested times), and remove ribs post-wrap early if the smoker runs hotkey to keep them juicy. The porky richness, boosted by apple cider steam and butter, pairs perfectly with smoky bark, making this method a set-and-forget win for busy hosts.
Essential Ingredients & Tools
Ingredients:
- 2 racks of baby back ribs (about 4-5 lbs. total)
- 2 tablespoons yellow mustard
Dry Rub
A great dry rub is the foundation of flavor for smoked ribs. Here’s a balanced, slightly sweet, and smoky rub:
- ¼ cup salt
- ¼ cup white sugar
- 2 tablespoons packed brown sugar
- 3-4 small pats of butter
- 2 tablespoons ground black pepper
- 2 tablespoons ground white pepper
- 2 tablespoons onion powder
- 1 tablespoon garlic powder
- 1 tablespoon chili powder
- 1 tablespoon ground paprika
- 1 tablespoon ground cumin
Sauce
While some BBQ purists prefer dry-rubbed ribs, a finishing sauce glaze adds a delicious layer of sweetness and depth. Here’s a simple BBQ sauce mix:
- 1 cup apple juice
- ¼ cup packed brown sugar
- ¼ cup barbeque sauce
Smoking Equipment
- Smoker: Pellet, offset, electric, or charcoal smokers work well for ribs.
- Wood: Choose hickory for a bold flavor, applewood for a mild sweetness, or mesquite for a strong smoky taste.
- Thermometer: Ensures the ribs reach the perfect doneness.
- Spray Bottle: Spritzing with apple juice or apple cider vinegar to keep ribs moist.
- Foil: Used in the wrapping phase for extra tenderness.
- Cutting Board & Sharp Knife: For slicing the ribs cleanly.
Directions to Make Smoked Baby Back Ribs:
1. Removing the Membrane:
Before seasoning your pork ribs, you must remove the thin membrane on the bone side—this papery layer turns chewy when cooked, blocking flavor and making the meat harder to eat. Here’s how: Lay the ribs flat on a cutting board, bone side up. Slide a semi-sharp object (like a butter knife) under the membrane near the center to pry it loose. Grip the edge with a paper towel and pull it off in one motion—if it starts tearing, regrip and keep pulling until it’s completely gone.
Pro tip: Some butchers pre-clean this, but always check! Removing it lets your salt-and-spice rub penetrate deeply and keeps the ribs soft during cooking. Once done, flip to the meaty side, stir your small bowl of spices (white sugar, brown sugar, paprika, cumin, etc.), and press the mix into the meat with a spoon for easier, even covering.
Why it’s important:
Leaving the membrane creates a tough barrier—like hard plastic—that ruins the tender texture and traps flavors. Removing it ensures rib racks cook evenly and absorb every bit of smoky goodness.
2. Apply Mustard and BBQ Rub
Step 1: Mustard Rub
Before applying the rub to your ribs, spread a thin layer of mustard (I prefer Dijon for a subtle tang, but yellow mustard works) on all sides, including the bone. This isn’t about taste—mustard’s mild flavor cooks off—but its sticky texture helps the spice mix adhere to the meat. Squeeze about ¼ cup of mustard onto the ribs, then use your hands or a brush to coat evenly. Mix your rub (a balanced measurement of brown sugar, paprika, salt, etc.) in a bowl, then press it firmly onto the sides of the ribs. The mustard acts as a binder, locking in the spices so they don’t fall off during smoking.
Why it’s important:
Skipping this step risks uneven seasoning—spices slide off dry meat, leaving bland patches. Mustard ensures every bite is flavor-packed, and its acidity subtly tenderizes the meat. Pro tip: From my competition days, a mustard base is the difference between “good” ribs and ribs that win trophies.
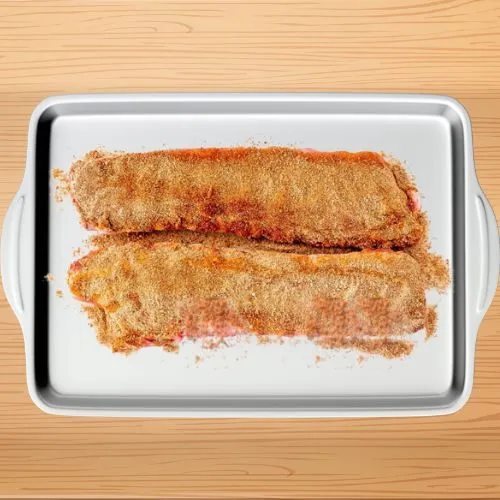
Step 2: Dry Rub
After slathering your pork ribs with mustard, pat the meat dry to ensure the rub sticks—mix 2 tablespoons each of salt, brown sugar, and spice blends (like Texas-style paprika or locally sourced Strawberry’s chili powder) for a balance of sweet and spicy. Cover every inch: flip the rack to coat the bone side, then turn to the meaty side, pressing the seasoning into the surface to form a paste that locks in juices. Avoid caked layers—less is more. Let the ribs sit refrigerated under plastic wrap for 30 minutes; this application lets flavors compliment the meat deeply. Pro tip: A well-applied rub creates a crust that smoke clings to in the smoker, transforming your BBQ from good to original pitmaster-level.
Why it’s important:
Skipping this step means uneven flavor and wasted spices—the rub forms a savory bark that cooks into the meat, while refrigeration tightens the cover, preventing fallout during smoking.
3. Get the Smoker Ready
Before sliding in the ribs, preheat your smoker to 225°F using indirect heat to avoid flare-ups. If your smoker has a water pan, fill it—this keeps humidity high, preventing dry meat and helping smoke cling to the ribs. Add wood chunks (hickory or applewood work best) for flavor, and let the smoker stabilize until it produces thin, blue smoke (a sign of clean combustion).
Pro tip: Patience here is key—rushing the preheat leads to uneven cooking or bitter smoke.
Why it’s important:
Proper setup ensures steady heat and smoke, the backbone of tender, flavorful ribs. Skipping this step risks tough meat or a harsh, acrid taste.
4. Smoking the Baby Back Ribs:
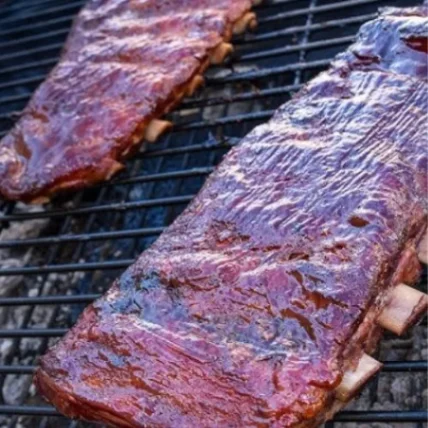
Step 1: Smoke Low and Slow for 3 Hours
Preheat your smoker to 225 degrees Fahrenheit—the lowest and slowest setting to break down the ribs’ connective tissue gently. Place the ribs meat side up on the grates, ensuring they’re not touching for even smoke circulation. Let them cook uncovered for 3 hours, absorbing steady smoke to build a flavorful bark. This step is about the basics: resist peeking (every lift of the lid adds 15 minutes to your cooking time!) and trust the process.
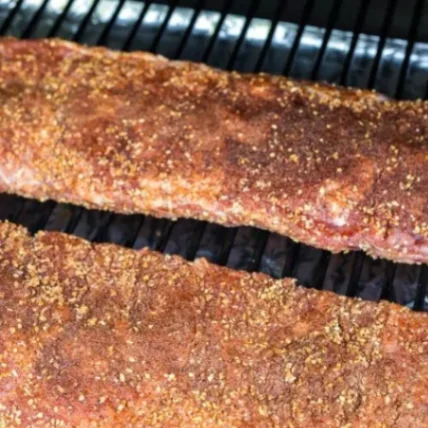
Pro tip:
From my early days, I learned that patience is non-negotiable here—the foundation of fall-off-the-bone tenderness starts with this uninterrupted smoke session.
Why it matters:
Skipping this low-and-slow phase risks tough meat. The steady heat renders fat slowly while the smoke infuses deep into the ribs, setting the stage for the next steps.
Step 2: Wrap and Steam for Melt-in-Your-Mouth Tenderness
After the first 3 hours, the ribs will look dry on the surface—this is normal! It’s time to wrap them tightly in heavy-duty foil (I use two sheets criss-crossed on a sheet pan) or nestle them in a disposable foil pan. Sprinkle 2 tablespoons brown sugar over each rack, 3-4 small pats of butter and pour 1 cup of apple cider (or apple juice, broth if you’re out) to create steam.

Seal the foil into an airtight package—this traps moisture and essentially braises the ribs in their juices. Return the packet to the smoker for 2 hours. When you unwrap them, you’ll see the magic: the dry exterior has softened, the collagen has melted, and the meat is now tender enough to pull apart with a fork.
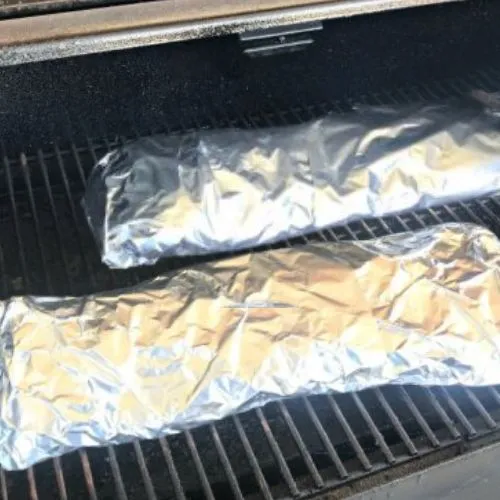
Pro tip: Don’t skip the liquid—it’s the key to transforming tough ribs into succulent, fall-off-the-bone perfection.
Why it’s crucial:
Wrapping prevents overcooking and locks in steam, ensuring the ribs stay juicy. The liquid also infuses subtle sweetness (from apple) or savory depth (from broth), balancing the smoky flavor.
Step 3: Glaze and Caramelize for Sticky, Smoky Perfection
Unwrap the ribs and brush them generously with your BBQ sauce (mix apple juice, brown sugar, and sauce for a sticky glaze). Place them meat side up back in the smoker at 225 degrees Fahrenheit for 1 hour. Baste every 20–30 minutes—this builds layers of flavor and creates a glossy, caramelized crust. Handle them gently; the ribs are so tender now they might fall apart if manhandled. The final hour lets the smoke kiss the sauced surface, locking in a smoky-sweet balance.
Pro tip: For extra sticky ribs, crank the heat to 250°F for the last 15 minutes—watch closely to avoid burning.
Why it’s key:
This step transforms saucy ribs into a finger-licking masterpiece. The glaze caramelizes, sealing in moisture while adding texture, and the smoke ensures every bite is deeply aromatic.
Alternative Smoking Method: Naked Smoke for Bold Bark
Skip the foil wrap and smoke your ribs uncovered the entire time at 225°F (5–6 hours total). This “naked” method creates a thick, firmer bark, intensifying the smoky flavor. To prevent drying, spritz the ribs every 45 minutes with apple juice or a 50/50 vinegar-water mix. Use a water pan in your smoker to boost humidity, and monitor the internal temp—195–203°F is still your target. Pro tip: This is how competition pitmasters roll—great for folks who crave a chewy, caramelized crust.
Why try it?
Unwrapped ribs develop a robust bark and deeper smoke penetration but require vigilance to avoid over-drying. Perfect for smoky flavor purists!
5. How to Know When Ribs Are Done
- Internal Temperature: Use a meat thermometer to check the thickest part (avoiding bones). 195–203°F is the sweet spot for tender, juicy ribs—collagen has melted, but the meat stays intact.
- Bend Test: Lift the rack with tongs. They’re done if it bends easily (about 45 degrees) and the meat cracks slightly on the surface.
- Toothpick Test: Slide a toothpick into the meat between the bones. They’re ready to devour, like softened butter, if it goes in with little resistance.
Pro tip: Combine all three tests for foolproof results. Ribs can trick you, and looks can be deceiving!
6. Resting & Serving the Ribs
- Resting for Maximum Juiciness:
After pulling the ribs off the smoker, let them rest on a cutting board for 10–15 minutes. This pause lets the juices settle back into the meat so they don’t spill out when you slice. Skip this step, and you’ll end up with dry ribs—no matter how perfectly you cooked them! Cover loosely with foil to keep warm, but don’t seal tightly (you don’t want to steam off that crispy bark).
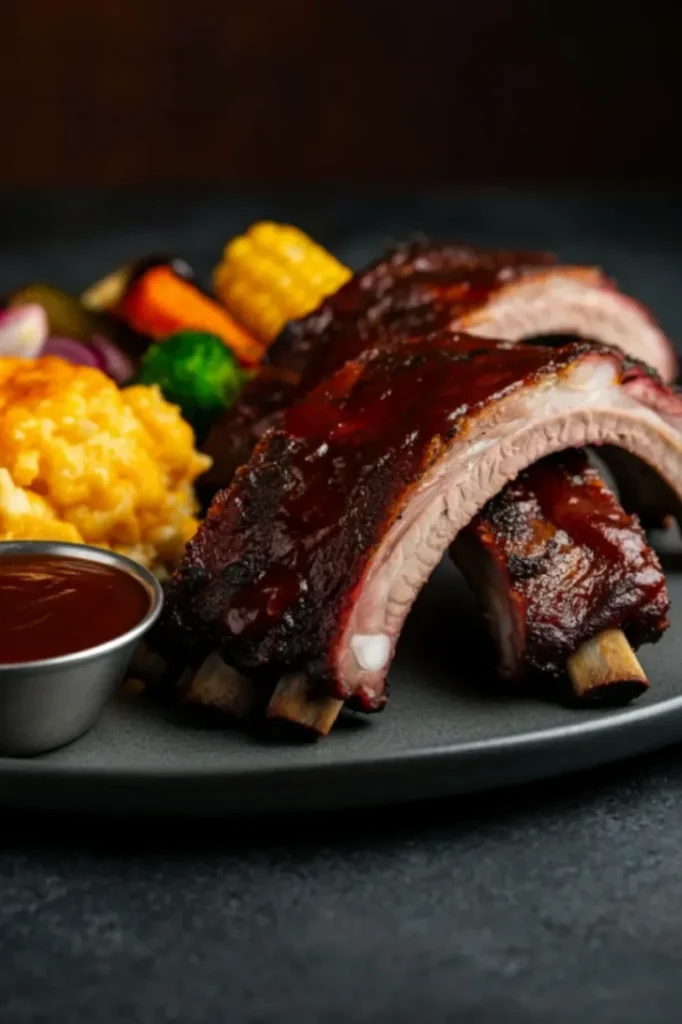
- Slicing & Serving:
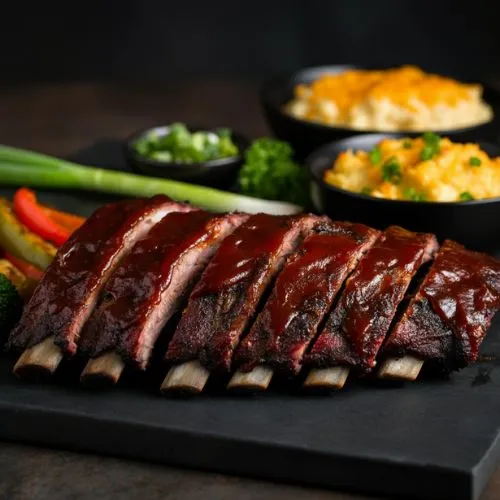
Grab a sharp knife and slice between the bones for clean, even portions. Angle the blade slightly for an Instagram-worthy presentation. Serve with extra BBQ sauce for dipping and classic sides.
Pro tip:
If the ribs are fall-off-the-bone tender, slide the knife gently—they’ll practically separate themselves.
Common Mistakes to Avoid
- Over-smoking: Piling on too much wood creates bitter, acrid ribs. Stick to a clean-burning fire with 2-3 wood chunks (like applewood or cherry) and avoid billowing white smoke—thin blue smoke is your goal. Pro tip: If your ribs taste like a campfire, you’ve overdone it.
- Inconsistent Temperature: Wild fluctuations in heat lead to tough, uneven texture. Use a digital thermometer to keep the smoker steady at 225°F, and don’t peek—every lid lift drops the temperature. Pro tip: A water pan inside the smoker buffers heat swings.
- Skipping the Resting Period: Cutting ribs too soon lets juices escape, leaving dry meat. Let them rest for 10–15 minutes, loosely tented with foil. Pro tip: Resting also makes slicing cleaner—no shredded edges!
Why it matters: These pitfalls ruin hours of effort. Nail the basics; your ribs will stay juicy, smoky, and tender.
How to Cook Ribs in the Oven (Smoker-Free Success)
No smoker? No problem! Here’s how to nail oven ribs with a grill finish for that smoky vibe:
- Prep the Ribs: Massage the spice rub into the ribs (don’t skip the underside!).
- Wrap & Bake: Tightly wrap each rack in aluminum foil, place on a baking sheet, and bake at 300˚F for 2 hours until tender (they should bend but not fall apart).
- Save the Juices: Let the ribs cool slightly, then unwrap and pour the juices into a bowl. Whisk in ½ cup barbecue sauce, ¼ cup apple cider, and 1 tbsp apple cider vinegar.
- Grill for Glory: Fire up the grill to medium-high. Brush the ribs with the sauce mixture and grill for 10 minutes, turning and basting until caramelized in spots.
- Serve: Slice into portions, drizzle with extra sauce, and devour!
Pro tip: Add a pinch of liquid smoke to the sauce mix for extra depth.
Tips for Variations, Substitutions, and Modifications
1. Flavor Variations
- Sweet and sticky: Swap BBQ sauce for a honey glaze (mix honey, soy sauce, and garlic) or add brown sugar to the rub.
- Spicy Kick: Add chipotle powder or cayenne pepper to the rub, or finish with hot honey or sriracha-infused sauce.
- Global Twists: Try a Korean-inspired rub (gochujang, ginger, sesame oil) or a Mexican blend (cumin, lime zest, smoked paprika).
- Wood Smoke: Applewood for sweetness, hickory for boldness, or pecan for nutty depth.
2. Ingredient Substitutions
- No Brown Sugar? Use maple syrup or coconut sugar in the rub.
- Apple Juice Alternative: Substitute with pineapple juice (adds tropical tang) or beer (adds malty richness).
- BBQ Sauce Swap: Try hoisin sauce (Asian flair) or chimichurri (herby brightness).
3. Dietary Tweaks
- Low-Carb: Replace sugar in the rub with erythritol or omit it entirely; use a sugar-free BBQ sauce.
- Gluten-Free: Ensure rub and sauce are GF—avoid soy sauce-based sauces unless labeled GF.
Pro Tips
- Marinating: For deeper flavor, marinate ribs in apple cider vinegar + spices overnight before smoking.
- Leftovers: Shred leftover meat into tacos or mac and cheese—the smoky flavor elevates everything!
From my experience, I once substituted apple juice with pineapple juice, which added a tropical vibe that paired perfectly with jerk seasoning. Experiment, but taste as you go!
What to Serve With Smoked Baby Back Ribs
Smoky, tender ribs deserve sides and drinks that balance their richness and amplify the BBQ vibe. Here’s how to build a crowd-pleasing spread:
Classic BBQ Sides
- Creamy Coleslaw: The crunch and tang cut through the ribs’ richness.
- Cornbread: Sweet, buttery, and perfect for soaking up sauce.
- Baked Beans: Smoky, sweet, and loaded with bacon or burnt ends.
- Cornbread Casserole: Swap traditional cornbread for this richer, creamier version with cheese or jalapeños for extra flair.
- Mac & Cheese: Go for a cheddar-gouda blend with a crispy breadcrumb topping.
- Mashed Potatoes: Add garlic, sour cream, or smoked cheddar for a BBQ-friendly twist.
Fresh & Zesty Pairings
- Grilled Corn: Slathered with chili-lime butter or cotija cheese.
- Pico de Gallo: Fresh tomatoes, onions, cilantro, and lime brighten up the smoky ribs.
- Pickled Vegetables (red onions, jalapeños, carrots): Bright acidity cleanses the palate.
- Watermelon Feta Salad: Juicy watermelon + salty feta + mint = summer perfection.
Collard Greens: Simmered with smoked turkey or bacon for Southern authenticity.
Drinks That Shine
- Iced Tea: Sweetened or unsweetened with lemon (a Southern staple).
- Craft Beer: Choose amber ales or smoked porters to match the ribs’ depth.
- Bourbon Cocktails: A mint julep or bourbon lemonade adds sophistication.
- Sparkling Lemonade: For a non-alcoholic, refreshing option.
Pro Tips
- Leftover hack: Chop rib meat into tacos or nachos the next day.
- Quick fix: Store-bought sides work! Doctor them up (e.g., add bacon to baked beans).
- Dessert: Keep it simple with peach cobbler or banana pudding.
From backyard BBQs to game-day feasts, these pairings turn ribs into a memorable meal.
Storage
Short-Term (3–4 Days)
- Cool Quickly: Let ribs cool to room temp (max 1 hour) to prevent bacteria growth.
- Wrap Tightly: Use foil or plastic wrap, then place in an airtight container or resealable bag.
- Refrigerate: Store in the fridge at 40°F or below.
Long-Term (Up to 3 Months)
- Freeze Portions: Slice ribs into smaller sections for easy thawing.
- Double Wrap: First in foil, then in a freezer-safe bag (squeeze out air).
- Label: Note the date to avoid freezer burn.
Reheating Tips
- Oven: Wrap in foil with a splash of apple juice. Bake at 250°F until warmed through (~20–30 mins).
- Grill: Reheat on indirect heat, basting with sauce to refresh flavor.
- Microwave: Quick fix—cover with a damp paper towel and nuke in 30-second bursts.
Pro Tip: Freeze ribs with a layer of sauce to lock in moisture. Thaw overnight in the fridge before reheating.
Avoid: Storing ribs in the smoker’s foil wrap—it traps steam and turns bark soggy.
Smoked Baby Back Ribs Recipe: 3-2-1 Method for Tender BBQ
Description
Master the 3-2-1 smoking method for juicy, fall-off-the-bone smoked baby back ribs. Perfect for BBQs, with step-by-step instructions and pro tips!
Ingredients
Dry Rub
Sauce
Directions:
-
-
- Prep the Ribs: Remove the thin membrane from the bone side of the ribs by sliding a butter knife under it, gripping it with a paper towel, and peeling it off. Pat the ribs dry with paper towels.
- Apply the Binder: Rub 2 tablespoons of yellow mustard evenly over both sides of the ribs. This helps the dry rub stick.
- Mix the Dry Rub: Combine ¼ cup salt, ¼ cup white sugar, 2 tablespoons brown sugar, 2 tablespoons black pepper, 2 tablespoons white pepper, 2 tablespoons onion powder, 1 tablespoon garlic powder, 1 tablespoon chili powder, 1 tablespoon paprika, and 1 tablespoon cumin in a bowl.
- Season generously: Sprinkle the dry rub onto both sides of the ribs, pressing gently to adhere. Let the ribs sit at room temperature for 30 minutes (or refrigerate overnight for deeper flavor).
- Preheat the Smoker: Set your smoker to 225°F and add wood chips (apple or hickory work best). Place a water pan inside to maintain moisture.
- Smoke the Ribs: Place the ribs meat-side up on the smoker grates. Smoke uncovered for 3 hours, spritzing with apple juice every 45 minutes to keep them moist.
- Wrap the Ribs: Lay each rack meat-side down on heavy-duty foil. Pour ½ cup apple juice and 3-4 small pats of butter, and sprinkle 2 tablespoons brown sugar over each rack. Seal the foil tightly.
- Continue Cooking: Return the foil-wrapped ribs to the smoker for 2 hours. The steam will tenderize the meat.
- Make the Sauce: Mix 1 cup apple juice, ¼ cup brown sugar, and ¼ cup BBQ sauce in a bowl. Set aside.
- Glaze the Ribs: Unwrap the ribs, brush them with the sauce mixture, and place them back on the smoker (meat-side up) for 1 final hour. Apply a second coat of sauce during the last 15 minutes.
- Rest and Serve: Let the ribs rest for 10–15 minutes before slicing between the bones. Serve with extra sauce and sides like coleslaw or cornbread.
-
Nutrition Facts
Servings 6
Serving Size 2–3 bones per person
- Amount Per Serving
- Calories 620kcal
- % Daily Value *
- Total Fat 40g62%
- Sodium 1200mg50%
- Total Carbohydrate 28g10%
- Sugars 18g
- Protein 38g76%
* Percent Daily Values are based on a 2,000 calorie diet. Your daily value may be higher or lower depending on your calorie needs.